
NTE 1.1 Banner Breakdown: Lacrimosa, Chaos, and Where Your Annulith Should Actually Go
The 1.1 patch for Neverness to Everness has its banner roadmap locked, and the lineup is going to test every wallet that survived launch. Phase 1 brings Lacrimosa, the Dark-side DPS the beta crowd has been waiting on, and Phase 2 follows up with a brand-new Lakshana attacker named Chaos. Both are S-Rank, both sit in completely different team archetypes, and both are going to want their signature Arc on top of the character pull. Below is the kit-by-kit, awakening-by-awakening read on what we know, plus a hard look at the gear math that came up in the last round of community testing — main-stat selection on Drive Disks, and whether the four-piece set bonus is even worth chasing if you could just stack more 3-piece flat bonuses instead.
What 1.1 Actually Puts On the Table
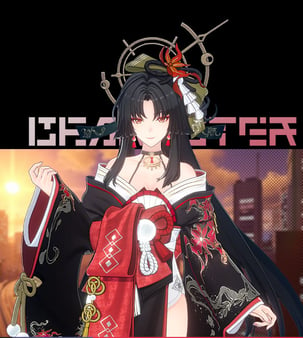
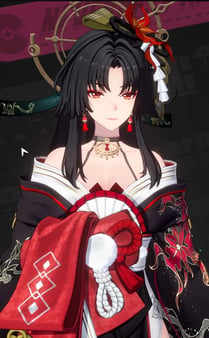
Phase 1 of Version 1.1 features Lacrimosa, going live June 3, 2026 onward. She's positioned as an S-Rank main DPS built around the Chaos element (the wheel slot the in-game UI labels as Dark/Purple), and her kit revolves around a unique stack called Nightmare. Phase 2 is Chaos — yes, the character is named after the element wheel slot, but Chaos himself is actually a Lakshana attacker affiliated with E.T.D. 6th Platoon. Skill data for him hasn't dropped yet, so this is mostly about Lacrimosa right now, with Chaos as a "save your dice" warning at the back of the article.
For context on what 1.1 has to compete with: launch month already burned through the Nanally banner (Anima/Plasma DPS, April 29 to May 13) and the Hotori banner (Cosmos/Solid, May 13 to June 3). If you spent into either of those, the carry-over pity from the limited pool follows you forward — that's worth remembering before you assume you're starting Lacrimosa from zero.
The pull math on a single banner is the same as it's been since beta. Limited banners have a 0.99% S-Rank base rate, soft pity opens up after 70 pulls, and the hard pity at 90 is a guaranteed featured S-character (no 50/50 split). A-Rank hard pity is 10. Pity counter carries over between limited banners, which is the single most important fact for budgeting: pulls you put into Hotori's tail end are not wasted if you don't hit her, they migrate forward.
The Arc (signature weapon) banner has its own rules: hard pity is 60 pulls for an S-Rank Arc, with a 25% chance for the current featured signature. If you lose that 25%, the next S-Rank within 20 pulls is guaranteed to be the limited Arc, so the absolute worst case is 80 pulls for the on-banner weapon.
Lacrimosa's Kit — The Nightmare DoT Engine
Lacrimosa is a sustained-damage main DPS whose entire identity is stacking and re-stacking the Nightmare debuff on a single target. Each tick of Nightmare deals one instance of Chaos (Dark) elemental damage per second for three seconds, and the stack count pumps her direct hits as well. She's also marked as the core of the reaction system — triggers when Chaos, Psyche, and Incantation are all present on the target, with a Break deduction kicking in whenever Nova and Scorch are both active simultaneously. Translation: she likes Psyche and Incantation teammates next to her, and she likes targets that get healed as little as possible, because the kit explicitly removes one Nightmare stack per heal taken.
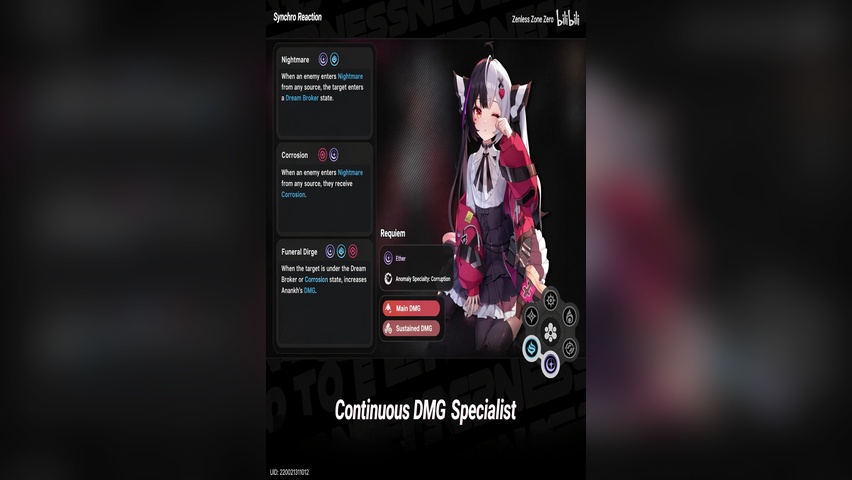
Her direct damage profile is also nothing to dismiss. The basic attack chain — labelled Tomato-Sauce Metal and Tomato-Sauce Percussion in the kit text — has solid hit values on its own, and her Switch Skill "Devil's Gift" is the trigger she uses to chain into the Nightmare detonation pieces unlocked at higher awakenings. Her Arc slot is Liquid type, which lines up with the standard set-piece options rather than forcing players into a bespoke build path.
The way she actually plays in a team: you ramp Nightmare on the boss with her on-field, Cycle to a Psyche or Incantation partner to seed the reaction, then swap back. Her Esper Meter generation is fast enough off basic attacks that you don't have to perfect-parry to keep the loop fed, although a parry will instant-fill it and is still the cleanest tempo if the boss telegraphs cleanly.
For Drive Disks, the priority is the same as any DPS in this game: Chaos Elemental Damage Bonus on the cup main stat (the 46.6% roll provides the biggest single jump), then Crit Rate / Crit Damage tuned around a 1:2 ratio. ATK% is the fallback if you cannot hit a useful elemental cup. Her damage formula behaves the same as everyone else's — Elemental Damage Bonus is additive within its own bucket and multiplies onto base damage, while Crit Rate × Crit Damage compounds separately, so balancing both is what keeps her ceiling from collapsing.
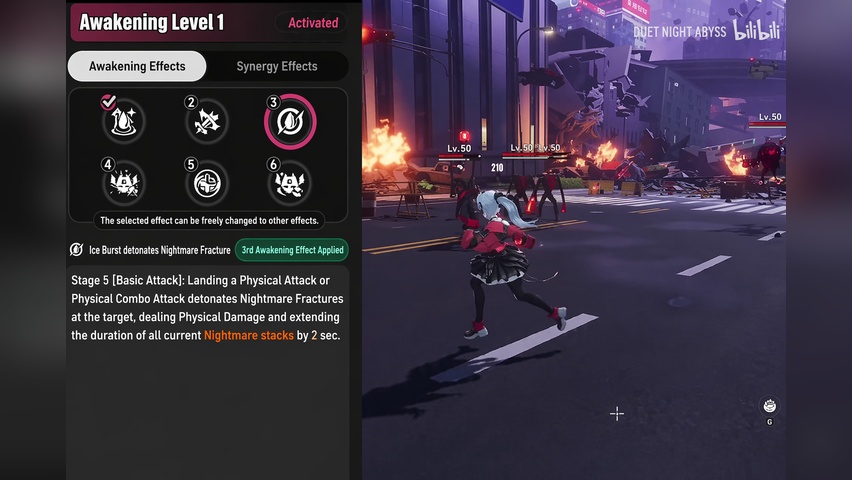
Awakening Tiers — What Each Rank Actually Buys You
Lacrimosa's awakening tree is unusually back-loaded. The early ranks tighten her kit, but the meaningful shape changes happen at A3 and beyond, and A6 is where her rotation becomes genuinely lazy.
Awakening summary based on the previewed tree:
| Rank | Effect | Why it matters |
|---|---|---|
| A3 | The 5th hit of Tomato-Sauce Metal or Tomato-Sauce Percussion detonates all currently accumulated Nightmare stacks on the target in one settlement. | Turns the DoT into a burst tool. Massive frontload damage on swap windows. |
| A4 | Nightmare duration extended to 6 seconds. | Doubles the base window from 3s to 6s, which means fewer re-applications and more uptime on setups. |
| A5 | Adds an extra mechanic to Nightmare itself (additional damage layer). | Pure damage multiplier on the central stack. |
| A6 | After casting Devil's Gift, for 5 seconds, swapping into Lacrimosa from any character that can trigger Dark Star, Scorch, or automatically casts her Support Skill without spending Cycle Meter, with a damage modifier on top. | The rotation crutch. Removes the "did I bank enough meter" check entirely during the burst window. |
In practical terms, A0 plays fine and is what most F2P accounts will end at. A2 is the comfortable line if you want her direct damage rounded out. A3 is the real "she feels different" tier because the detonation completely changes her swap timing. A6 is the whales-only tier and turns her rotation into autopilot.
The boring conclusion is the right one: 90 pulls for A0 is the safe budget for most accounts. Anything past A2 should be a deliberate choice, not a "one more ten-pull" reflex. Carry-over pity from Hotori's tail makes A0 cheaper for some players than the raw 90 number suggests — count what you have first.
Chaos and Why You Should Freeze Your Hathor Builds Right Now
Chaos lands in Phase 2 of 1.1. The dossier confirms two things: he's a Lakshana-element character, and he's affiliated with E.T.D. 6th Platoon (the same in-fiction unit referenced in Lacrimosa's dialog flavor about reimbursement budgets). Skill numbers, multipliers, and combo flow are not public, so anyone showing you a "Chaos rotation guide" right now is making it up.
The actionable advice from the creator's stance is simple and worth repeating, because it saves real resources: if you intend to pull Chaos in Phase 2, stop investing in Hathor materials immediately. They share the same Esper element, which means they will fight for the same Drive Disk pieces, the same elemental teammates, and the same Arc slots in your team. Levelling Hathor right now and then pivoting to Chaos in three weeks throws away breakthrough materials, weapon dust, and disk substat rolls that will never come back. Put that account energy into Lacrimosa or save it for Chaos — those are the two correct uses of a 1.1-window F2P stockpile.
The same holds in reverse: if you've already invested heavily into Hathor and like her, skipping Chaos is not a tragedy. The two will likely overlap in team comp, and running both means you're double-paying for the same archetype slot. Pick one and commit.
Drive Disk Main Stat — Elemental Damage Bonus vs Crit Damage
A debate that surfaced after the previous gear guide: when sub-stats roll out roughly equal, is it better to put Elemental Damage Bonus on the main stat, or Crit Damage? Side-by-side bench testing settles it.
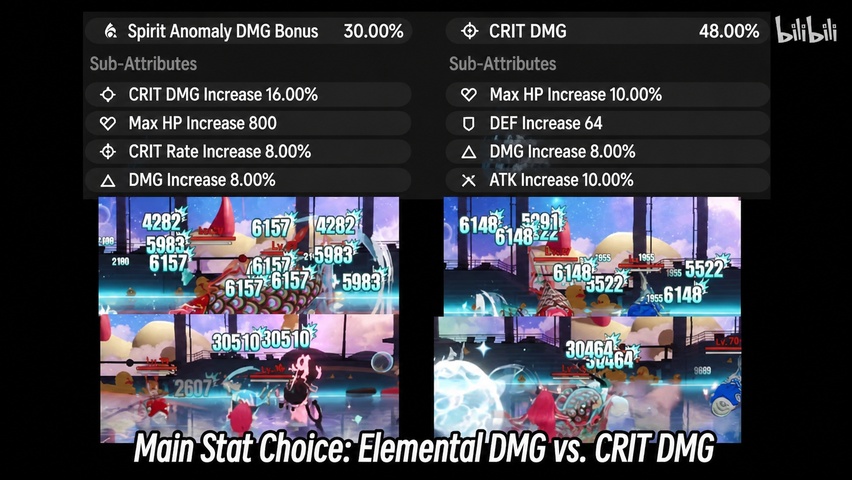
The result lands almost flat. With sub-stats normalized, the actual on-target damage between an Elemental Damage Bonus cup and a Crit Damage cup is essentially identical for a typical DPS scaling profile. That tracks with the formula: Elemental Damage Bonus is additive within its own bucket and multiplies the base damage line, while Crit Damage multiplies through the (1 + CR × CD) crit term. For a build sitting in a normal Crit Rate range, those two paths converge once the percentages on the cups are comparable.
The takeaway is to stop optimizing the main-stat name and start optimizing the actual sub-stat lines. If you have two pieces with the same overall power, take the one whose sub-stats have higher Crit Rate, Crit Damage, ATK%, or matching elemental rolls — the cup label is downstream of that. The exception is when one option is a real elemental cup at a high roll value (a 46.6% elemental main stat) versus a partially rolled crit cup; in that case the elemental cup wins on raw magnitude, not because the name is special.
This also means players obsessing over "I cannot use this disk because the cup says Crit Damage instead of Light Damage" are leaving free progress on the floor. Equip what's there, farm replacements at your own pace.
The 4-Piece Set Question — Defense vs Stacking 3-Piece Bonuses
The other smart question that came in: instead of running a 4-piece bonus that 25% defense after the Ultimate, can you just slot two 3-piece bonuses (each granting +20% elemental damage) and end up ahead?
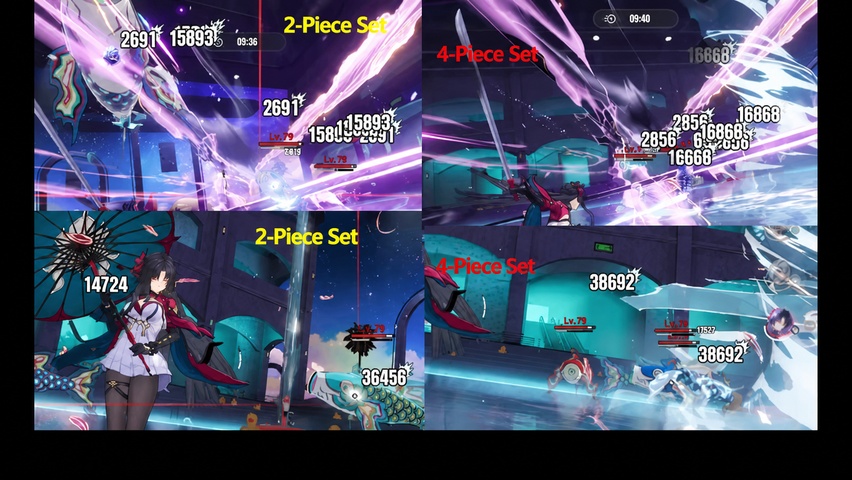
Bench numbers say no. The 4-piece configuration consistently outperforms the alternative once the Ultimate-conditional defense is up — which, for any real DPS rotation, is going to be most of the actual damage window. The difference shows up clearly in the pair of test hits: the 4-piece run lands the bigger numbers on the empowered swing, even though the "stacked elemental bonus" build looks better on paper.
The reason is the formula stack. Elemental damage from set bonuses ends up additive with every other elemental line you've already got — your cup, your awakening passives, your team buffs. Adding a +20% to a pile that already reads 60–80% nets a smaller relative increase than you think. Defense on the other hand, is a separate multiplier on the enemy side of the equation, applied after all of that. It gets bigger the more your damage already is. You don't replace a multiplier with another piece of additive. Run the 4-piece.
The practical rule for now: stick with a 4-piece on your main DPS. The 2 + 2 + 2 split is a transitional config you tolerate while farming, not a final build.
Pull Budget and Resource Math for F2P Planning
One pull costs 160 Annulith on the limited banner. That gives you a clean exchange rate to plan against, especially if you're stacking a mix of Annulith and Solid Dice (the limited-banner gacha currency). Quick reference table for the Lacrimosa window:
| Goal | Pulls needed | Annulith equivalent (or Solid Dice) |
|---|---|---|
| A0 safe pity | 90 | 14,400 Annulith / 90 Solid Dice |
| A0 comfortable (variance buffer + milestone rewards) | 120 | 19,200 Annulith / 120 Solid Dice |
| Lucky early line | 50 to 70 | 8,000 to 11,200 Annulith |
| A0 + signature Arc | 90 + 60 to 80 | 24,000 to 27,200 Annulith total |
Important caveat: the limited Arc banner runs on its own pity, separate from the character pity, and rolls Tri-Keys instead of Solid Dice. Don't mix them in your head. Character first, Arc second — if you cannot afford both cleanly, the character is always the bigger fight-changer than the weapon.
Daily and event income across a banner window is normally enough to put a low-spending account close to the 90-pull line if you've been saving since Phase 2 of launch. If you spent into Hotori, your pity counter carries forward, which can knock 20–40 pulls off your effective Lacrimosa cost. Check that number in your banner UI before you panic-buy a Riftcrystal Permit.
For pure F2P pacing: hit the milestone cosmetic rewards along the way (the limited pool grants outfit, livery, and glider cosmetics at cumulative pull thresholds), do not chase A2 or higher unless you've already cleared A0 with budget left over, and treat Chaos as a separate fund — every die you spend chasing Lacrimosa awakenings is a die you don't have for him three weeks later.
Codes, Pre-Reg Mail, and Loose Resources Worth Grabbing
Before 1.1 lands, sweep up the active redeem codes still floating from the launch window. The ones still live as of mid-May 2026:
- NTEFREE — 30,000 Fons.
- NTEvtuber200 — 10,000 Beetle Coins, 10,000 Fons.
- 504980102FKGOVNS — 30 Annulith, 1 Gubichi Original Flavor Chips, 20,000 Beetle Coins.
- NTEGIFT — 50 Annulith, 5 Rising Hunter Guides, 5 Light Dye.
- NTE0429 — 100 Annulith, 2 Elite Hunter Guides, 2 Chaotic Dye, 12,000 Beetle Coins.
- NTENANALLYGO — 100 Annulith, 5 Senior Hunter Guides, 5 Colorless Dye, 6,000 Beetle Coins.
- NTENOWTOENJOY — 100 Annulith, 5 Rising Hunter Guides, 5 Light Dye, 4,000 Beetle Coins.
NTEHAVEFUN already expired on May 6, so don't bother trying it. Total Annulith out of the live codes is small individually but adds up to roughly two extra pulls when stacked, which is two pulls you didn't have to grind for.
Pre-registration milestones already paid out in everyone's mailbox: 30,000 Beetle Coins, 20 Elite Hunter Guides, 20 Fabricated Dice, the A-Class Haniel character, and the Officer Whisker glider livery. Make sure you've actually claimed those — the mail unlocks staggered through early progression and some of them sit unclaimed on accounts where the player just blew past the prompt.
The free S-Class side door is also still open if you skipped it. Zero is your starting main, Mint and Adler unlock through main story, Aurelia drops from a 3-day login chain, and Chiz comes from the City Tycoon track at sufficient level. None of these cost dice. Building one of them as a sturdy team pillar means your limited-banner pulls don't have to also cover your team's basic structure.
Last reminder before the patch hits: if you're planning around Chaos in 1.1 Phase 2, the single biggest mistake you can make right now is panic-spending Annulith on Lacrimosa awakenings past A0 because you forgot you wanted Chaos too. Lock your budget by character before the banner timer starts, not during the banner. The math doesn't get nicer with adrenaline involved.


Comments