
Wuthering Waves 3.3 Anniversary And Edgerunners Crossover: A New Player Roadmap
I've been on this account since launch, so let me just say it straight: the 3.3 anniversary patch plus the upcoming Cyberpunk: Edgerunners collab in 3.4 is the single best window we've had to start playing. The free anniversary pulls, the giveaway Resonator, a meta-defining anniversary main DPS, and a guaranteed crossover team are all stacking up at once. If you've been waiting on a sign, this is it.
The plan below assumes you're starting from zero. I'll walk through the pull economy, who's worth your Astrite, how to climb early, and what the Echo grind actually looks like once you stop being a tourist.
What's Actually Landing In 3.3 And 3.4
The anniversary patch closes out the Lahai-Roi storyline and sets up the crossover. Version 3.4 is scheduled for launch around June 8, 2026, with the Edgerunners collaboration arriving after Version 3.3 wraps up. Two crossover Resonators come with it. Lucy and Rebecca are the collab characters, with Lucy joining as the 3.4 first-half banner and Rebecca being given out for free.
Lucy is the one you actually have to convene for. She's a limited 5-star Spectro Pistols Main DPS arriving in Version 3.4 Phase 1 with no expected rerun, and her core mechanic stacks Spectro Frazzle via Basic Attacks and Resonance Skills for continuous Spectro damage, feeding her Resonance Liberation. Her kit also folds in Monowire close-range attacks that give movement or invincibility frames, so the rhythm is stack, burst, reposition. That makes her a stylish skill-expression character, not a hold-button-to-win one.
Rebecca is the freebie. She's a free-to-claim 5-star Resonator during the collaboration event who wields her iconic machine gun. Pair them and you instantly own a complete duo without spending a single pull on her side of it.
The anniversary itself is dumping pulls on us. Login rewards include 20 free Radiant Tides for the Version 3.3 anniversary login, split into 10 starting April 30 and 10 on May 23. There's also a pull-back style reward tied to the anniversary main DPS that the creator notes can shave further pulls off the cost of acquiring her. Stack this on top of the standard 90–120 free pulls every patch and you're looking at the most generous starter runway the game has ever offered.
The Convene System In Plain Words
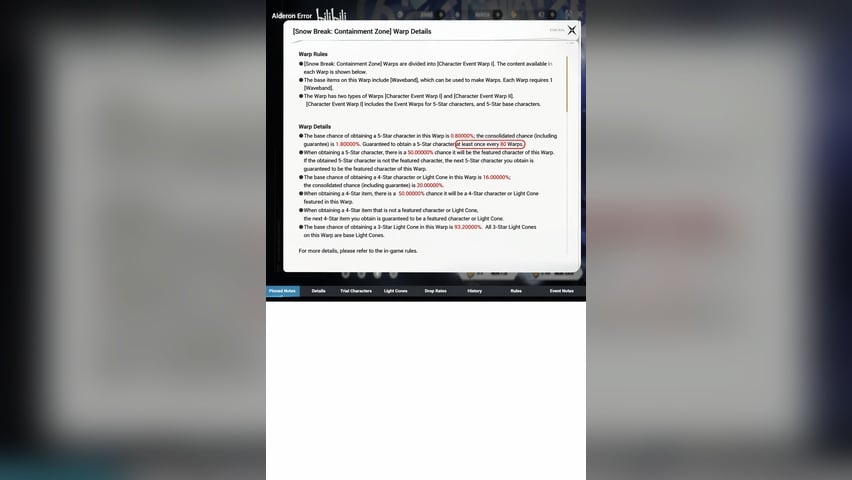
Currencies first, because new players get burned on this. There are three Tides: Lustrous Tide for standard, Radiant Tide for limited character, and Forging Tide for weapon, and each Tide costs 160 Astrite. Paid currency converts one-to-one into free pull currency, but never the other way around. Never spend Radiant Tides to grab a permanent banner pull — that's how new accounts evaporate their starter savings.
Here's the actual math on the limited character banner:
| Banner | Pity | Behavior |
|---|---|---|
| Character Event Convene | 80-pull pity for 5-star, 50/50 system | 160 pulls to guarantee featured |
| Weapon Event Convene | 80-pull pity, 100% guarantee for signature weapon | No 50/50 |
| Standard Weapon Banner | 80-pull pity, 100% guarantee for chosen 5-star from a pool of five | Single chosen weapon |
| Beginner's Choice | 80-pull max, guarantees player-selected 5-star, closes after obtaining | Uses Lustrous Tide |
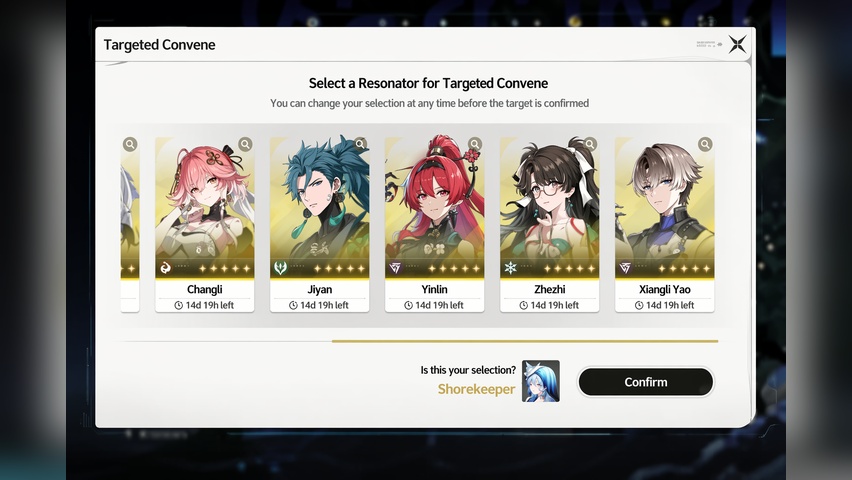
| Novice Convene | 50-pull guarantee for 5-star with 20% discount on x10 pulls, 50 total convenes, currency Lustrous Tide | Featured: Verina, Encore, Calcharo, Lingyang, Jianxin |
Base 5-star rate is 0.8% but the overall rate including pity is 1.8%, and soft pity ramps starting around 65–70 pulls, so most 5-stars actually drop a bit before the hard 80 cap.
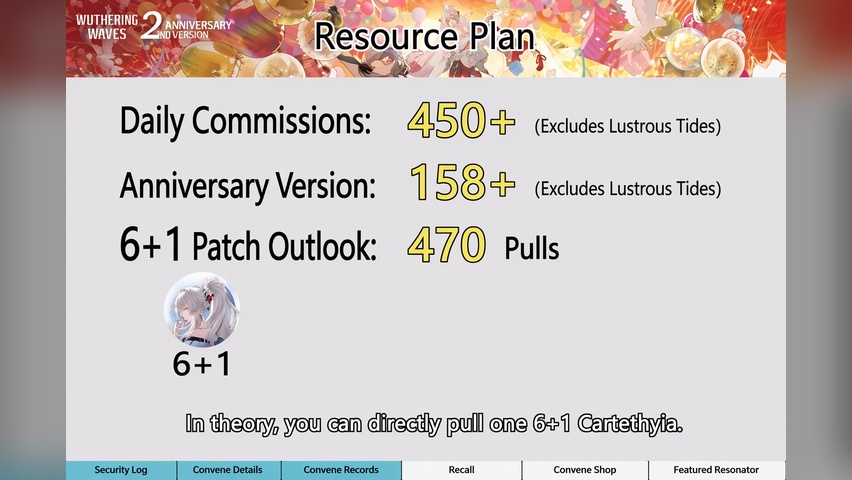
A clean 0+1 (the character plus their signature weapon) costs roughly 138 pulls on average. That's why subscribing matters even if you don't whale.
Lustrous Tide Subscription And Spending Tiers
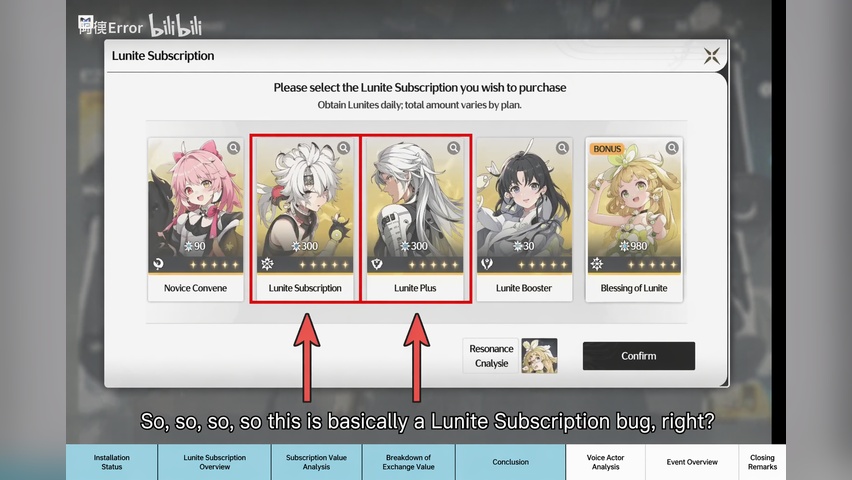
If you spend a single dollar, make it the monthly. The Lunite Subscription costs $4.99 for 30 days, gives 300 Lunite on purchase plus 90 Lunite daily, for roughly 3000 Astrite value equivalent to 18.7 pulls at $0.27 per pull — the best cost-performance pack in the shop. Skip the bundled cosmetic packs unless the monthly is fully drained first; double-Lunite refreshes have better per-dollar conversion than any of the supply gift boxes.
The Afterglow Coral shop is where mid-budget players get squeezed for Resonance Chains. Limited 5-star Wavebands cost 360 Afterglow Coral, featured 4-star Wavebands cost 270, you earn 8 Afterglow Coral per Tide, plus 3 per 4-star pull and 15 per 5-star pull. The smart play is to save Afterglow Coral and complete the Resonance Chain on a character you already pulled the signature for, jumping from "does its job" to "stomps content." Two Wavebands per character is the hard cap, but those S2 unlocks are where Wuthering Waves characters genuinely transform.
Anniversary Main DPS Priority And The Crossover Plan
The 3.3 first-half anniversary headliner is Phrolova, and she's the keystone for anyone starting now. She's a 5-star Havoc Rectifier Main DPS/Support with Lv90 base ATK 437 and Crit DMG 150%. Her gameplay loop is unusual in a satisfying way: she builds up to 6 Volatile Notes then uses Heavy Attack Scarlet Coda to enable Resonance Liberation, entering a 24-second Maestro State that summons Hecate for on/off-field coordinated attacks. She also scales Crit damage hard through her own buff system — Aftersound stacks (max 24) grant up to 100% Crit DMG.
Her optimal weapon and skill targets:
- Skill priority: Resonance Liberation > Normal Attack > Forte Circuit > Intro Skill > Resonance Skill
- Signature is Lethean Elegy — 24.3% Crit Rate with +32% Resonance Skill DMG, +32% Echo Skill DMG Amp, and 8% DEF
- Whispers of Sirens ~82%, Stringmaster ~79%, Rime-Draped Sprouts ~75%, Cosmic Ripples ~69% relative damage as alternates
If you started on the anniversary and emptied all your one-time exploration rewards, you can realistically aim for a 6+1 Phrolova, then in 3.4 pick up a 0+0 anniversary support, a 0+1 Lucy, and slot the free Rebecca next to her. That gives you two full damage cores within a few weeks at potentially less than a single monthly's worth of spending — but it also means burning every one-time reward in the game, so it's the high-variance route. The safer play for non-whales: prioritize Phrolova's S2 or S3 (the 2/1 or 3/1 ratio), let her signature wait, and lean on her Resonance Chain power spike instead.
Sub-DPS for Phrolova doesn't arrive until 3.4 second half, and the support slot is filled by the 3.3 second-half rerun of a Coordinated Attack support that completes her logical lineup. For brand-new accounts, ownership beats signature weapons every time — get the bodies first, polish later.
Support Choices And Why Not Every Banner Is For You
There are three flexible supports in current Wuthering Waves, and they're tiered very clearly by usage rate in endgame modes.
The Shorekeeper sits at SS (T0) overall, in Tower of Adversity, and in Whimpering Wastes thanks to top-tier sustain, healing, and team buffs. If you didn't pull her organically and you have no other healer worth using, the Novice Convene's selectable banner is the one corner where I'd still consider spending — she goes in basically every high-end comp. Default meta usage puts Shorekeeper in nearly every high-end comp (Sigrika + Qiuyuan, Aemeath + Lynae, Cartethyia, Augusta), with Sanhua as a flexible substitute.
Sanhua is S+ (T0.5) overall, S-tier in Tower of Adversity and A-tier in Whimpering Wastes, functioning as a quick-swap support with buffs and energy generation. She's free from the standard pool eventually, and very efficient. Brant is SS (T0) overall and in Whimpering Wastes, A/T1 in Tower of Adversity, and excels in prolonged fights and multi-wave uptime.
About the novice self-select banner: only one 1.0-era character is worth pulling there now, and that's Shorekeeper. The other names on the selector are over two years old at this point and their numbers don't scale to current content. The banner doesn't share pity with anything else, so committing means committing — only worth it if you've got some budget and need a healer.
For a four-star anchor, take Verina from the new player selector when offered. She's the all-purpose ATK-buffing healer that fills the gap whenever you don't own a limited support. Her S2 in particular makes her ridiculous value for the pull cost.
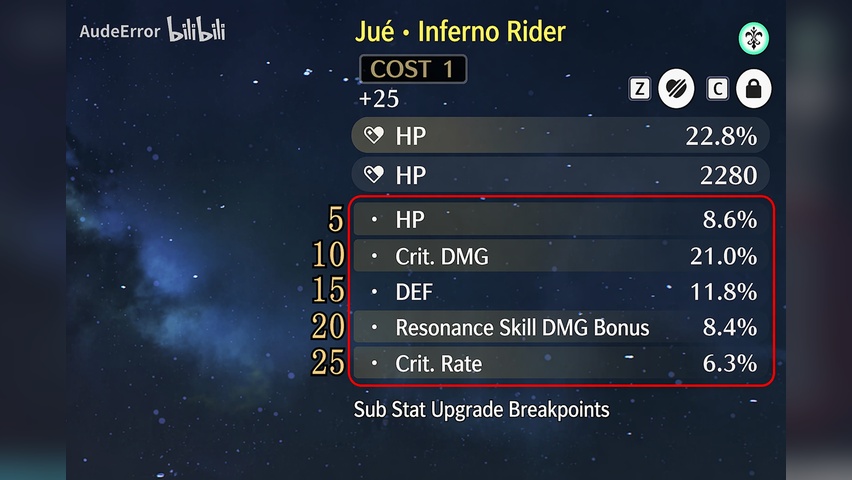
Echoes: The Real Grind That Replaces Your Gear Slot
Echoes are your equipment system, and they're split by Cost. Echo costs are 1-Cost (Common), 3-Cost (Elite), and 4-Cost (Overlord/Calamity). The standard endgame setup is 4/3/3/1/1, totaling the cost limit of 12 at Data Bank Lv9.
Each Echo carries a main stat, a fixed secondary, and substats:
- Main stat pools: 1-Cost (HP%/ATK%/DEF%), 3-Cost adds Energy Regen% and Attribute DMG%, 4-Cost adds Crit Rate%/Crit DMG%/Healing Bonus%
- Secondary main stats are fixed: 1-Cost Flat HP, 3-Cost Flat ATK, 4-Cost Flat ATK
- Substats via Tuners include Flat and percentage HP/ATK/DEF, Energy Regen%, Crit Rate/DMG, and per-skill DMG Bonus%
Drop rates and quality scale with Data Bank level. Data Bank Lv15 unlocks max Gold (Rank 5) absorption with a 30% Gold Echo chance, while Lv21 requires SOL3 Phase 3 plus Union Level 20 and gives 5-star Gold Echoes; pity exists on bosses at 4 Elite kills or 2 Boss kills.
Sets are where the damage actually shows up. The relevant ones to know:
| Set | 2-piece | 5-piece |
|---|---|---|
| Frosty Resolve | Resonance Skill DMG +12% | Casting Resonance Skill grants 18% Glacio DMG Bonus for 18s; Liberation stacks Resonance Skill DMG by 5 for 2s |
| Empyrean Anthem | Energy Regen +10% | Coordinated Attack DMG +80%; crits grant +20% ATK for 4s to active Resonator |
| Sun-sinking Eclipse | Havoc DMG +10% | Basic or Heavy Attack increases Havoc DMG by 7.5% (max 4 stacks) for 15s |
| Void Thunder | Electro DMG +10% | +15% Electro DMG after Heavy or Resonance Skill, max 2 stacks for 15s |
| Lingering Tunes | ATK increase | Stacking ATK buff plus large Outro Skill DMG increase |
For substats, chase a "small graduation" rather than perfection. Sealed Tubes are leveling materials — Basic 500 EXP, Medium 1000, Advanced 2000, Premium 5000 — and leveled echoes return 75% EXP when used as fodder, so don't max every Echo to 25 immediately. Crit Rate, Crit Damage, and percentage ATK are the holy trinity. Anything else is gravy.
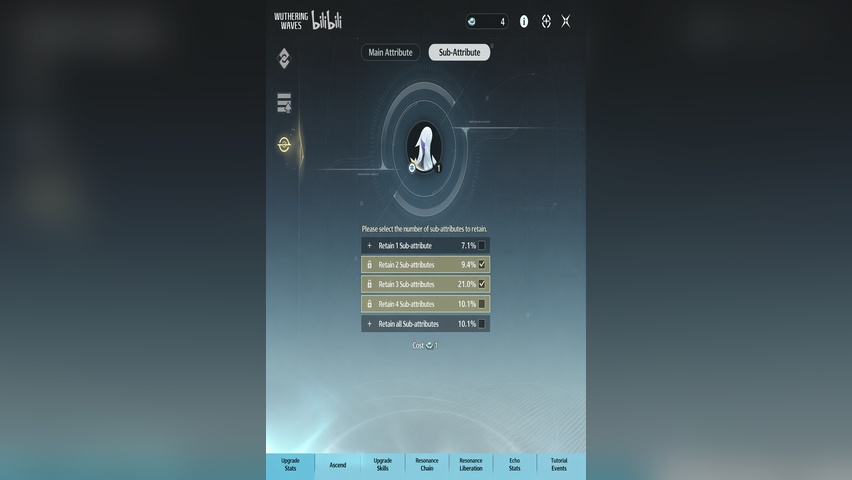
Tuners, Resets, And Why You Shouldn't Cry Over Substats
The Tuner item lets you re-roll the main stat of an unleveled Echo onto whatever you want, which means you're never stuck farming wrong-stat 4-Costs forever. It's not particularly rare, and events hand it out — this is the deliberate friction-reducer the developer has built into the system.
The substat reset item is a different story. Locking 1–2 substats costs 1 reset item, locking 3 costs 2, and locking 4 costs 3, and these are real-money premium items at a fairly painful rate. Use it only when you have a perfect double-Crit roll and you're trying to upgrade the other three lines. Trying to chase max-roll Crit values from non-max bases is how people set their wallets on fire.
A practical absorption hierarchy at Data Bank Lv15+:
- 4-Cost main piece (highest Echo Skill multipliers) — guaranteed 1 of 2
- Set bonus filler 3-Cost with correct element/attribute% — 1 of 4
- 1-Cost flex pieces for cost-cap math — 1 of 4
- Data Bank reroll on main stat — up to 10 at once
For early-account jumpstart, run the recurring Patchwork Dream event from Union Lv17. Spend 400 and 800 Patchwork Dream tokens on a 3-Cost Gold Echo selector box — Phrolova chooses Frosty Resolve, Yinlin choose Sierra Gale, Floral pick Sun-sinking Eclipse. Two free correctly-statted Gold 3-Costs at full subs is a massive early-account power spike for zero meaningful long-term cost.
Early Game Routing, Stamina, And Endgame Modes
Don't fight the main story order if you care about plot, but if you're skipping cutscenes, jump straight to Chapter 2. The traversal is cleaner, the maps are flight-friendly, and the boxes are simpler to scoop. Chapter 3 introduces motorcycle leveling and aggressive ambient mobs that slow new accounts down.
The single biggest QoL trick early on is food. Jinzhou Skewers add +100 ATK to your party for 15 minutes and override other food buffs. Because that's flat ATK rather than percentage, it scales hardest precisely when your characters are weak. Buy them by the stack from Pan Hua Restaurant in Jinzhou City.
For Union Level grinding, every 10 levels raises Resonator Ascension cap, so leveling your account is leveling your team. Once you hit Union 40, the three weekly endgame modes open up.
Whimpering Wastes is the permanent endgame mode added in Version 3.3, requiring Union Level 30 and the "Ocean is a Soul's Rest" quest, and uses two full teams across timed stages. Tower of Adversity rewards Astrite per crest milestone. Tower of Adversity Stable Zone gives 100 Astrite per crest milestone, Experiment Zone 100, and Hazard Zone 75/50.
Stamina priority for the first month of an account is brutally simple: your main DPS's level, weapon level, key skill levels, then Echoes that look approximately right. After that, sub-DPS and healers. The reason is mechanical — Outro Skill buffs don't scale with the buffer's level, so a 0+0 sub-DPS sitting at Lv40 still passes a fully buffed handoff to your main DPS. Pour everything into the carry first and you'll feel the difference immediately.
One last thing on intro/outro mechanics: a basic 3-2-1 rotation has your healer leave in the 3 slot to give the whole team a buff, your sub-DPS in slot 2 hands off to slot 1, and slot 1's main DPS eats every stacking buff before unloading their Resonance Liberation. That's the entire skeleton of the combat system, and it doesn't change between casual play and clearing the hardest Tower stage. Get this loop right and you'll never feel like Wuthering Waves is gatekeeping you out of content.


Comments