
Blood Strike Shotgun, LMG, Sniper and Sidearm Loadouts: A Newbie's Survival Pack
Part two of the weapon walkthrough cuts straight to the loud half of the arsenal. Shotguns decide every doorway fight, the lone LMG worth carrying does its own thing, snipers split into a clear "use these three, avoid these two" list, and your sidearm slot has exactly one build that punches above its weight. Everything below tracks the actual stat sheet inside the game, not vibes.
Why Shotguns Decide Lava Realm Lobbies
The shotgun bracket has gotten heavier with every patch, and the current Lava Realm tier list has the Origin-12 Warrior skin variant sitting at S-tier all on its own — no AR, no SMG, no sniper next to it. That isn't a coincidence. Final-circle fights collapse into 5–10 meter rooms, doorways, and stairwells, and that is exactly the bracket where Origin-12 lands a 2-shot kill. Push to 10 meters and the kill count climbs to 3, then 5 by 15 meters. The whole pitch is: don't fire from outside the kill bubble, and you can't lose.
The reason the creator opens with shotguns rather than ARs is simple — if you can't clear a room in the back half of a match, your loadout doesn't matter. Three shotguns matter in the current build: the Origin-12 (auto), the MP155 (pump), and the M1887 (lever). The video's stance is that all three are viable; pick the one whose rhythm clicks with you. That's not a cop-out. The fire patterns are genuinely different, and forcing a pump-action feel onto someone who plays full-auto AR is a fast track to losing point-blank trades.
One more general tip from the creator before getting into specific builds: if you lean toward the Origin-12 Dragon's Breath / fire-element variant ("Long Xi"), buy life insurance for your parents first. The phrase is a joke about the burn-tick damage being so aggressive that the gun nearly trivializes the early bracket. The straight Origin-12 doesn't have that crutch and rewards cleaner positioning instead.
A practical loadout philosophy that runs through the whole guide: always pair a shotgun with something that covers 30+ meters. The dossier-recommended pairing is Origin-12 plus M4A1 Dragon Dance for clean 0–60 m coverage. Carry a sniper instead and you've built a "doorway king plus rooftop king" loadout with a hard dead zone in the middle, which is fixable but punishing if you misplay rotations.
A quick note on the wider weapon meta from independent rankings — most outside tier lists have Origin-12 in the top shotgun spot, with the Kala as the undisputed long-range king and the P90 as the SMG benchmark. The video's recommendations don't fight that consensus; they sharpen it for someone who is just trying to survive past Striker Level 13 and isn't going to grind 20 weapons in parallel.
| Shotgun | Fire Mode | Damage | Fire Rate | Range | Mobility | Unlock |
|---|---|---|---|---|---|---|
| Origin-12 | Automatic | 33 | 16 | 4 | 38 | Striker Lv 1 |
| MP155 | Single | 50 | 6 | 4 | 38 | Striker Lv 9 |
The trade is visible at a glance: Origin-12 trades raw damage for fire rate and forgiveness. MP155 punishes misses but rewards positioning. M1887 sits between them in feel, even though the dossier doesn't pin its numbers down here.
Origin-12: The 2-Shot Doorway King
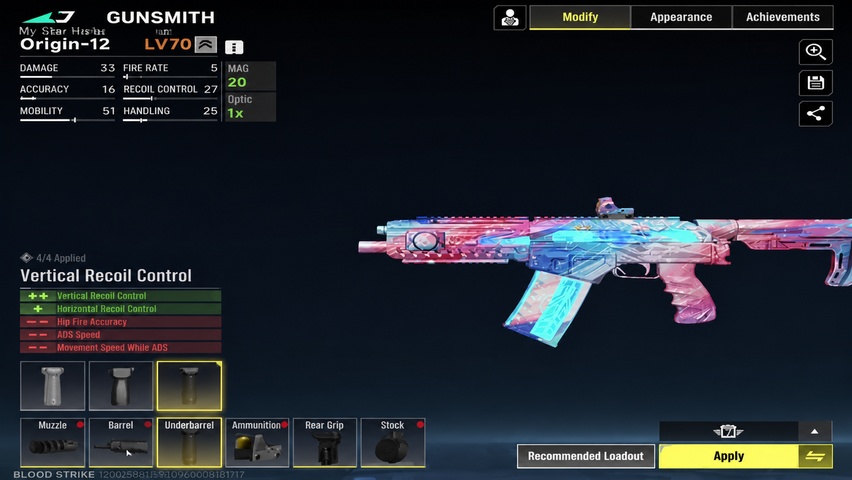
Origin-12 is the auto-shotgun the entire shotgun meta orbits around. Two shells to the chest at 5 meters, three at 10, five at 15 — past that you are throwing away pellets. The base profile is 33 damage, 16 fire rate, 4 range, 18 accuracy, 30 recoil control, and 38 mobility. With the recommended attachments, range nudges to 5, recoil control to 33, and accuracy to 22.
Build:
- Muzzle Brake — Weapon Level 3
- Extended Barrel — Weapon Level 30
- Forward Universal Grip — Weapon Level 2
- No Stock — Weapon Level 5
- 12-Round Mag — Weapon Level 6
The 12-round mag is the sweet spot for most lobbies — enough ammo to clean two players in a row without the stat hit of going bigger. The video calls out the 20-round drum specifically as an upgrade if you want to keep pressing through a stairwell or into a fortified building. The 20-round mag adds true sustain, but every extra shell is weight you carry between fights.
Empty / no stock looks like a bug at first — why drop a stock entirely? The reason is that every available stock degrades hip-fire accuracy on this gun more than the mobility return justifies. You want this shotgun firing from the hip while sliding through doors, not aiming down sights. Forward Universal Grip stacks neatly on top, keeping the weapon stable while sprint-firing.
Use cases where Origin-12 carries you:
- Final ring on Shutter Island when buildings are stacked
- Stair pushes after a teammate breaks the door with a frag
- Anti-flank duty while your squadmate runs the long-range gun
Where it falls apart: any open ground past 15 meters. The fire rate is high enough that pellet count masks accuracy issues at short range, but at distance the spread becomes a coin flip and you lose to anything with a real range stat. Treat it as a melee weapon with bullets.
If you're chasing the cosmetic ladder, the Origin-12 Warrior skin is the gold-efficient pickup of the current pass cycle and the only S-tier weapon skin on the Lava Realm chart. It doesn't change the underlying numbers but it does ride the existing power curve.
MP155: The Single-Fire Heavy Hitter
The MP155 is the "miss and you die" shotgun. Damage 50 — the highest in the class — but fire rate 6, recoil control 13, and accuracy 13 in its base form. After the recommended kit, you're looking at 50 damage, 6 fire rate, 5 range, 20 recoil control, 15 accuracy, and 34 mobility. It unlocks at Striker Level 9.
Build:
- Muzzle Brake — Weapon Level 6
- 14.5" Punisher Barrel — Weapon Level 50
- Heavy Stock Pro — Weapon Level 30
- 12-Round Mag — Weapon Level 35
The video specifically calls out a fork in the barrel pick: you can swap to a different barrel that boosts mobility, but the recommendation here is to lean into hip-fire stacking instead. That's the build above — heavy stock, heavy barrel, prioritize the one-shot connect rather than dancing around the fight. If you'd rather skirmish than hold an angle, swap in a lighter barrel and accept the recoil tradeoff.
| Stat | Base | Recommended |
|---|---|---|
| Damage | 50 | 50 |
| Fire Rate | 6 | 6 |
| Range | 4 | 5 |
| Mobility | 38 | 34 |
| Recoil Control | 13 | 20 |
| Accuracy | 13 | 15 |
What makes this thing work in a real match isn't the headline damage. It's the way it forces enemies to commit. You don't need to hit twice — landing one clean shell at point-blank breaks armor and forces a retreat or a panicked SMG spray, which a teammate can clean up. The MP155 is a team-play shotgun more than a solo carry. Holding a corner with it and a pre-aimed line beats running it out into the open every time.
Avoid it on rotation maps where you're crossing open fields. The 6 fire rate gives no margin if your first shell misses, and the reload chain is long enough that competent players will close and finish you before round two. Save it for hold-the-room defensive setups.
M1887 and the Wider Shotgun Picture

The M1887 caught a magazine capacity nerf in the most recent balance pass but still earns a recommendation in the video. The creator's stance: "still strong, copy the attachments yourself." Translation — the build philosophy isn't a secret, but the stat-sheet detail isn't pinned in the same dossier the other shotguns are, so I'd rather not invent numbers. What is on record is the broader takeaway: all three shotguns (Origin-12, MP155, M1887) are viable in skilled hands, and the right pick is whichever one fits your reload rhythm.
A few honest comparisons:
- Origin-12 is the most forgiving. Miss the first pellet, the second is on the way in a quarter-second.
- MP155 is the most punishing in both directions — punishes misses, punishes anyone you do hit clean.
- M1887 sits between them in tempo, with a lever-action cadence that some players just feel better with.
If you're a brand-new player still on Striker Level 1 progression, Origin-12 is the obvious starter — it's already unlocked and it builds out fast. MP155 unlocks at Striker Level 9, which most players hit in their first evening of play. M1887 is the latest joiner to the rotation and has the least settled meta around it.
The wider tier-list context is worth keeping in your head. Independent shotgun rankings put Origin-12 and MP155 in their A/S brackets and don't really place anything else competitive next to them across multiple seasons. That stability matters — shotguns get rebalanced less often than ARs and SMGs, so a build you learn now stays useful for weeks instead of getting patched out in the next cycle.
Quick triage on which shotgun to grind first if you're starting fresh:
- Origin-12 — best return on early weapon XP, lowest skill floor
- MP155 — pick up second once Striker Level 9 hits
- M1887 — round out the kit only after you're comfortable with the first two
Don't try to learn all three at once. Weapon XP is finite per session and split-grinding three shotguns leaves you with three half-built guns instead of one weapon you trust.
RPK: The Only LMG Worth Your Weapon XP
The video's stance on machine guns is blunt — only one is worth using, and that's the RPK. Skip the Minigun (which exists in the roster with 25 accuracy and a 75-round base mag bumping to 150 with attachments, but the creator does not recommend it). The RPK does the work of holding angles and "raking" a squad in a single sustained burst.
| Stat | RPK Base |
|---|---|
| Body damage | 34 |
| Headshot damage | 68 |
| Fire rate | 650 RPM |
| TTK (perfect) | 0.37 s |
| Effective range | 45 m |
| Mobility | 85/100 |
| Magazine | 100 rounds |
Build:
- Extended Barrel — Level 20
- Romeo4T Red Dot — Level 42
- Extended Vertical Grip — Level 40
- Balanced Stock
- Extended mags
The RPK's recoil signature has a quirk that's worth memorizing — it pulls upward-left for the first 15 rounds, then snaps to a pure vertical climb. Reset time is 0.24 seconds, which is short enough that disciplined trigger taps recover almost instantly. The optimal usage split:
- 0–25 m: full auto, hold the trigger, you'll out-DPS most ARs
- 35+ m: 8–12 round bursts, let the recoil reset between, treat it like a heavy DMR
Sensitivity recommendation that pairs with this weapon profile: 45–55% medium sensitivity with a 0.9x ADS multiplier. That gives you enough wrist room to ride the recoil pattern without overshooting on the upper-left phase.
Perks worth pairing:
- Fast Reload (a 100-round dump takes long enough to matter)
- Survivability for health regen and damage resistance — RPK users get pushed hard
- Movement perks for sprint-and-slide repositioning between angles
The RPK is the squad-fight weapon. In a 4v4 scenario, one player on RPK locking down a sightline forces the enemy to either commit a smoke grenade or rotate, both of which buy your team free seconds. It's not a solo-carry weapon — running it alone in early-game drops gets you killed by anyone with an SMG who closes the distance — but as a coordinated team tool, it's the only LMG that earns its slot.
The Vermilion Silence skin variant is the cosmetic to chase if you commit to the RPK as a main.
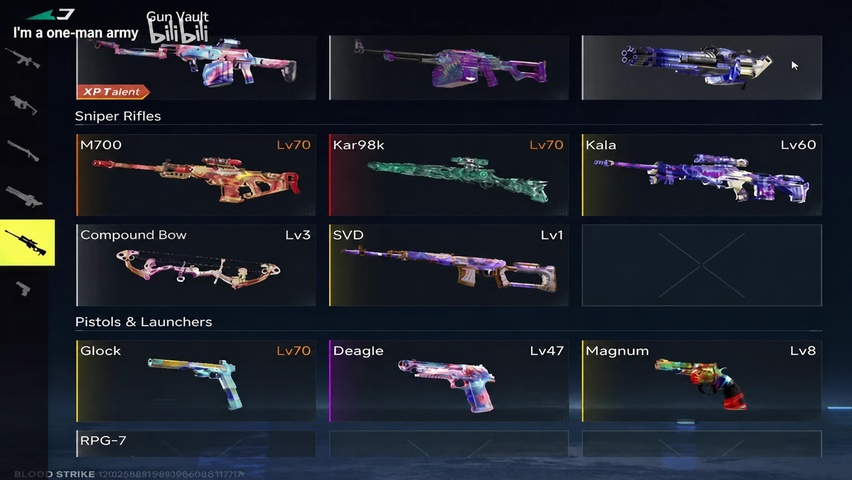
Snipers: Run the Old Three, Skip the Trick Shots
The sniper guidance is simple — run the "old three" (Kala, M700, Kar98k) and avoid the Bow and SVD entirely. The 2025 sniper tier list backs that exactly: S-tier is the Kala alone, A-tier is M700 and Kar98k, and the gimmick weapons (compound Bow, SVD marksman) get no placement worth mentioning. Multiple outside rankings reach the same conclusion on Kala specifically — long-range king, cleanest one-shot potential in the game.
The Kala loadout:
- Compensator — Weapon Level 34
- No Barrel
- Tango 6.0x Optic — Weapon Level 46
- Lightweight Stock — Weapon Level 26
- 7-Round Incendiary Mag — Weapon Level 22
Stats: 125 damage base (250 to the head with 90% headshot lethality), 200 range, recoil control climbing from 68 to 83 with the kit, 25 mobility. Kala is the rifle you carry when you intend to lock down a ridgeline for a full circle and refuse to move.
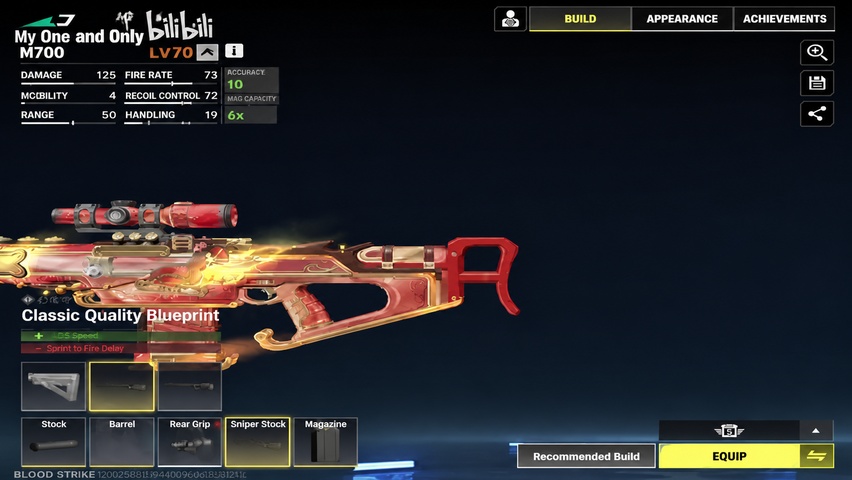
The M700 loadout:
- Compensator — Weapon Level 34
- 23" Barrel — Weapon Level 10
- Tango 6.0x Optic — Weapon Level 37
- ACIS Stock — Weapon Level 30
- 10-Round Mag — Weapon Level 20
Stats with kit: 125 damage, 71 range, 89 recoil control, 23 accuracy, 34 mobility. The M700's pitch over Kala is mobility — 34 vs 25 is the difference between repositioning between every shot and being stuck on one rock for the whole circle. If you play aggressive sniper rotations rather than camping, M700 is the better pick. The May 2025 stability patch also smoothed out sway across all three of the recommended snipers, which is why the older builds still work cleanly today.
A quick comparison of why these three earn the slot:
| Sniper | Damage | Range | Mobility | Best Use |
|---|---|---|---|---|
| Kala | 125 | 200 | 25 | Static long-range hold |
| M700 | 125 | 71 | 35 | Mobile mid-range play |
| Kar98k | — | — | — | Improved post-May 2025 patch |
The Bow and SVD are flagged specifically as pitfalls. They aren't garbage — the video's exact wording is "not recommended doesn't mean trash" — but they're trick weapons that punish anyone who isn't already a confident sniper. New players asking "what should I use?" should not be picking either of those. Stick to the three above until you have hundreds of confirmed long-range kills.
One pairing principle: snipers don't carry alone. If you're running Kala as your primary, your secondary needs to handle 0–20 meters because the Kala absolutely cannot. That's where the next section comes in.
Akimbo Glock and Sidearm Choices
The closing recommendation is dual-wield Glocks. It's the sidearm build the video calls out specifically, and the math on it is honest — base Glock damage is 35; Akimbo configuration pushes that to 64 with a 25-round mag per hand. Two streams of pistol fire at 64 damage per shot, 20 fire rate per gun, and 54 accuracy with the kit. That's not a "funny meme build," that's a legitimate emergency option for any sniper or shotgunner who gets pushed at 5 meters.
Akimbo Glock build:
- VAL Muzzle Brake — Weapon Level 14
- SAS Tactical Barrel — Weapon Level 30
- 25-Round Mag — Weapon Level 20
- Akimbo Glocks — Weapon Level 40 + 20 ADS kills
The 20-ADS-kills requirement is the gating mechanic. You need to actually use the Glock in single-wield, scoped, for 20 confirmed kills before the dual-wield unlocks. Plan a low-stakes session to grind that — pure deathmatch lobbies with a Glock-only personal challenge clears it in an evening or two.
Stat comparison for the sidearm slot:
| Pistol | Damage | Fire Rate | Range | Accuracy | Unlock |
|---|---|---|---|---|---|
| Glock (base) | 35 | 20 | 10 | 40 | Striker Lv 1 |
| Glock (Akimbo) | 64 | 20 | 9 | 54 | Lv 40 + 20 ADS kills |
| Deagle (base) | 83 | 13 | 12 | 40 | Striker Lv 15 |
| Deagle (kit) | 83 | 13 | 11 | 33 RC, 42 acc | — |
Deagle is the alternative if you want raw damage in the secondary slot, with a strong build (Compensator at Lv 23, Dark Flame Barrel at Lv 10, 2.0x Combat Sight at Lv 25, 13-Round Mag at Lv 30) that turns it into a near-rifle in close fights. But the Akimbo Glock is what the creator specifically pairs with the sniper trio, because you want fire rate and forgiveness, not single-shot precision, when something runs into your sniper bubble.
A quick rule of thumb for sidearm pairing:
- Primary is a sniper → Akimbo Glock (need bullet volume to survive a push)
- Primary is a shotgun → Deagle (you already have close-range covered, want range backup)
- Primary is an AR → either works, lean Akimbo for run-and-gun or Deagle for hold-an-angle
Don't sleep on the secondary slot. A weak sidearm choice is the most common reason solo players die during reloads. Origin-12 plus an empty pistol slot, or Kala plus a default Deagle, both leave gaps wide enough for any aggressive squad to walk through.
Putting the Loadouts Together
Three loadout templates pull all of this together cleanly:
The Pusher — Origin-12 + Akimbo Glock. 0–15 m on the shotgun, anything closer than that on the dual pistols. Pair with Movement perks. Best for Shutter Island building fights and final-circle interiors. Skill floor is low; this is the loadout to learn first.
The Anchor — RPK + Deagle. 0–45 m on the LMG, secondary for clean-up if anyone slips inside the bubble. Pair with Survivability and Fast Reload. Best for squad play where you have a teammate who can scout and ping for you. Skill floor is medium; recoil pattern takes about ten matches to internalize.
The Hold — Kala + Akimbo Glock. 60+ m on the rifle, panic button at point-blank. Pair with Movement perks even though you're sniping — when the circle moves, you can't afford to be slow. Skill floor is high; misses cost real tempo.
A few cross-cutting points the video hammers:
- Don't grind weapons you won't actually use. The Bow, SVD, and Minigun appear on weapon screens; that doesn't mean you should waste XP on them.
- Watch for the in-game Balance Announcement button. It surfaces patch notes for weapon and Striker tuning, which matters more than tier-list articles since the meta shifts mid-season.
- Don't chase cosmetic skins as power upgrades. The MP7 Green Glow is C-tier explicitly because it's cosmetic-only with no underlying stat improvement. The Origin-12 Warrior is S-tier because the underlying weapon is already S-tier — the skin doesn't add power, it just dresses up an already-meta gun.
Last note on the Strike Pass economy if you're considering paying in: the Lava Realm pass costs 520 Gold and fully refunds 520 Gold at tier 50, with the Ash Lord character, NOVA Crimson Impact at tier 10, and the SCAR Hellhound at tier 30 along the way. Roughly 30–40 hours of play across the 42-day season hits tier 50 with 150–250 Gold per day from daily missions. If you'll grind that out anyway, the pass effectively pays for itself plus the rewards. If you won't, skip it and spend the Gold directly on the Origin-12 Warrior or the M4A1 Dragon Dance, in that order.
Promo codes worth checking before they expire: BSREWARD10K, BLOODSTRIKEFB, TYSTRIKERS, 5MSTRIKERS. Free Gold is free Gold.


Comments