
The Real 0+0 Feiying Verdict After 160 Warps and a Memory of Chaos Stress Test
Sixty warps over pity, a 50/50 loss to Argenti on the way, and Feiying finally walked through the door at 160. That's the setup behind this run: no signature Light Cone, no Eidolons, every trace cranked, and a straight march into Memory of Chaos to see whether the new Magical Girl Elation DPS holds up when you can't hand her a whale's wallet. The short answer is yes, with caveats — and the caveats matter, because she's about to start fighting Silver Wolf Lv.999 for the same support slot.
The video runs on auto-battle data, not hand-piloted combos. That's a deliberate choice. Manual rotations on Elation kits can squeeze huge numbers if you babysit Punchline counters and time Skill Point handouts perfectly, but most players won't. The auto numbers below are the floor, not the ceiling.
The 0+0 Build Sheet at a Glance
The character panel is straightforward, no exotic tech: shop-exchange Light Cone, the standard Elation 4-piece, and traces fully unlocked. Every slot is something a free player can actually own without planning months ahead.

| Slot | Choice | Notes |
|---|---|---|
| Light Cone | Mushy Shroomy's Adventures (4★) | Shop-redeemable; Elation DMG buff stacks up to the cap |
| Relic Set | Ever-Glorious Magical Girl (4-piece) | Cavern of Corrosion: Path of Possession |
| Body | Crit DMG | Higher payoff than Crit Rate at the assumed CR floor |
| Feet | SPD | Non-negotiable — gates the Elation breakpoints |
| Sphere | DEF% or HP% | Survivability over offense; explained below |
| Rope | Energy Regen Rate | Keeps the Ultimate cycling under auto |
| Substat priority | CR > CD > SPD > ATK% | Standard DPS template |
The Mushy Shroomy choice is the headline. The dossier already tags it as the alternative 4★ for the broader Yao Guang Elation umbrella — +12–20% Elation buff plus +6–10% Elation DMG taken by enemies — so it scales reasonably with whoever the buffer is. For a 0+0 player who skipped the signature banner, this is the cone you can actually farm passively from shop currency.
The Magical Girl 4-piece is best-in-slot for Elation DPS by the same dossier; the bonus stacks CRIT DMG and Elation DMG and farms out of Path of Possession. Pair it with a Crit DMG body, and the build's 60-plus Crit Rate / 240-plus Crit DMG target fits naturally without forcing a Crit Rate body.
The trace tree is flat-maxed. No selective skipping, no SP-over-Ult prioritization. Every percentile of damage matters when you don't have Eidolons softening the pity damage curve, and on auto you can't compensate with timing.
Why the Sphere Slot Goes Defensive
Most build guides default to ATK% or DMG% spheres on a DPS. This run argues against that for one reason: Huohuo's healing throughput.
Huohuo's kit is a Skill-gated single-target heal (14% max HP + 140 to the chosen ally, 11.2% + 112 splash to adjacent) with Divine Provision drip-healing (3% max HP + 30 per trigger, capped at 6 procs across two turns). Solid sustain on paper, but in MoC second-half waves where Kafka chunks the back row and the elite enemies hit through bursts, Divine Provision's drip can't cover real damage spikes. The dossier's E2 line — "prevents ally KO once up to 2 times per battle with 50% Max HP restore" — only matters if you actually pulled the Eidolon, which a 0+0 build pointedly didn't.
Without that safety net, Feiying eats hits that would end the run. The video shows exactly that scenario: in one attempt the only thing standing between a wipe and a clear was Castorice's pull, and the subtitle author flat-out admits the fight would have ended without her. So a defensive sphere — DEF% or HP% — buys real cycles back. The same logic applies if you swap in Silver Wolf Lv.999 later: she's not a tank either.
The trade-off is roughly one substat tier of personal damage for the survival floor. On auto, that's a profit. On manual, where you can dodge ult timing, it's debatable.
Stat Targets That Actually Matter
The "soft graduation" thresholds called out in the video are tight, not aspirational.
| Stat | Target | Why |
|---|---|---|
| Crit Rate | ≥ 60% | Bare floor for Magical Girl set + Crit DMG body math |
| Crit DMG | ≥ 240% | Pairs with the CR floor at roughly 1:4, leaning into CDmg |
| SPD | ~134 | Hits the rotation breakpoint that keeps Yao Guang's Decalight Zone fed |
These are not "endgame" numbers. The 134 SPD line is what the auto rotation actually demands — it's the breakpoint that makes the Yao Guang + Elation Trailblazer turn order line up so Feiying gets her enhanced actions before the enemy elite phase. Push past it and you're paying a substat tax for nothing; fall short and you lose a Punchline window per cycle.
A 1:4 Crit ratio is unusual. Most Elation DPS templates run 1:2 or 1:3. The reason it skews here is the Magical Girl set's CRIT DMG pre-loading plus the Crit DMG body — Crit Rate gets cheap to acquire, Crit DMG doesn't. If your Crit Rate climbs above 70%, you can drop the body to a Crit Rate piece and rebalance, but at the 0+0 entry point, leaning into CDmg is the higher-yield path.
The energy rope is the third leg. Without ERR, the ultimate timing slips by a half-action per cycle, and the Decalight Zone Yao Guang projects starts ending before Feiying's enhanced state can fully cash in. ERR rope plus 134 SPD means she gets the ult window, every cycle, on auto.
Team Composition and the Yao Guang Bottleneck
The recommended squad is Feiying + Elation Trailblazer + Yao Guang + Huohuo. Three Elation slots, one Abundance healer. No Harmony seat, no second sustain.
Why this works: Yao Guang's Decalight Unveils All Zone hands the entire team an Elation stat equal to her own, and her Talent triggers a Great Boon Elation hit on every Aha Instant. The dossier confirms her stat-injection design — "uses Yao Guang's Elation stat if ally's is lower" — which means even a 0+0 Feiying without her own Elation investment still benefits from Yao Guang's panel. That's the entire reason this build can run on a budget Light Cone.
The Elation Trailblazer fills the Skill Point engine and adds a second Aha trigger. Huohuo handles ATK buff (+24% via ult) plus the energy regen (15% Max Energy to allies on ult) plus the dispel and the heal. Three buffs in one slot, basically.
Here's the catch the video keeps coming back to: Feiying and Silver Wolf Lv.999 want the same Yao Guang. Both are Elation DPS, both rely on Decalight Zone for the Elation stat injection, both peak when Aha Instants chain. There is no version of the meta where you run them in the same team, and there is no version where either one ditches Yao Guang for a different buffer. If you didn't pull Yao Guang on her debut banner, you're now looking at a much smaller team-building space for two consecutive new DPS.
The video's read on this is sharp: anyone who pulled Yao Guang for the version-opening Elation slot got two anchor characters' worth of value out of one banner. That's a strong argument for treating big-version opening supports as priority pulls going forward.
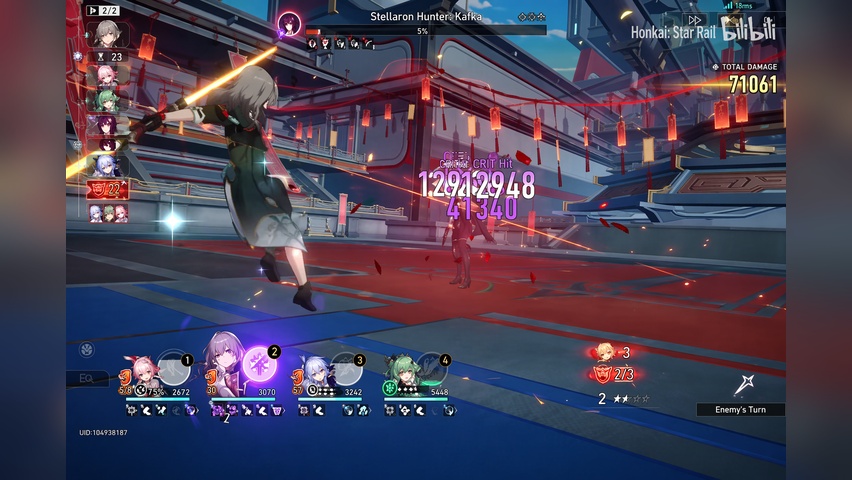
Memory of Chaos Floor 12 Performance
The benchmark wave: Kafka in MoC Floor 12 second half, full auto, 0+0 across the entire team.
| Test | Team | Cycles | Notes |
|---|---|---|---|
| MoC 12 lower half — Kafka boss | Feiying / Elation TB / Yao Guang / Huohuo | 3 | Full clear on auto |
| MoC 12 lower half — Kafka boss (manual) | Same | "could push to 2T" with signature LC | Stated, not demonstrated |
| MoC 12 lower half — Wolf Knight | Same | 4 | Full clear on auto |
| MoC 12 lower half — Wolf Knight | Silver Wolf Lv.999 swapped in for Elation TB | 3 | Auto, demonstrates the SW999 + Yao Guang ceiling |
A 3-cycle Kafka clear on a 0+0 team is a passing grade in current MoC scoring. It's not a speedrun — the 12-star threshold caps at a higher cycle budget anyway — but it confirms the build clears without forcing manual play. The 2-cycle figure with a signature Light Cone is mentioned but not recommended for free players, since the same Stellar Jade investment is better saved for upcoming releases.
The Wolf Knight result is more interesting because it shows the team's ceiling when you swap the third Elation seat. Feiying + Silver Wolf Lv.999 + Yao Guang + Huohuo is a legal team and pushes the cycle count down from 4 to 3 against the same enemy. That's a one-cycle gain from the Eidolon-zero SW999 alone. So if you only have budget to build one MoC team and you have both DPS characters, doubling up on Elation is viable — just expect the second team slot to feel thin.
Pull Priority Through the Rest of Version 4
Anyone holding Stellar Jade right now is staring down a busy six weeks. The dossier's roadmap puts three high-pull-cost units in close succession: Mortenax Blade in 4.3 Phase 1, the Fate collab Part 2 in 4.3 Phase 2, and the Version 4 storyline conclusion in 4.4. Add SP Himeko somewhere in the same window.
Mortenax Blade is the immediate budget question. He's a Fire / Nihility support running June 2–24, 2026 (UTC-5), with the kit centered on Vulnerability debuffs and team-wide ATK buffs rather than the original Blade's Wind Destruction blood-knight design. Standard 5★ rate of 0.6%, 50/50 system, 90 hard pity for a non-featured 5★ on the limited banner. The dossier explicitly flags his signature Light Cone as strongly recommended, which makes him a two-banner commitment if you want full output.
The 4.3 Phase 2 collab is a separate gacha system entirely, with Gilgamesh as the Phase 2 burst DPS and Rin Tohsaka as a potential free E0. Collab gachas don't pull from the same Special Pass pool as the limited banners, so the Stellar Jade competition is real but the pity isn't shared.
The Version 4.4 unit closing out the storyline arc is the one nobody has stats for yet. The dossier flags it as a "powerful conclusion" character — attribute and Path unknown — which is exactly the situation where a free player should hold reserves. Pull-budget guides for Mortenax Blade himself note that resource-limited players should approach his banner with measured pulls rather than going all-in, and that math gets harder when you stack the 4.4 unit on top.
So for a free player, the 0+0 Feiying lesson generalizes: skip signature Light Cones, skip Eidolons, run shop-redeemable 4★ cones, and bank everything that isn't a confirmed must-have. The Magical Girl 4-piece will still be there in 4.4. The Stellar Jade you spent on a signature won't.
The Silver Wolf Lv.999 Overlap Problem
Worth a closer look: Silver Wolf Lv.999's kit is dense, and her Hidden MMR scaling makes her one of the strongest Elation DPS on paper. The dossier breaks down exactly how the Hidden MMR system feeds her crit ratio:
- 0.15% CRIT Rate per Hidden MMR point until you cap at 100% CR
- After that cap, surplus Hidden MMR converts to a tiny CRIT DMG bonus (0.003% per point)
- "Godmode Player" state at 60 Hidden MMR — CC immunity, enhanced Basic and Skill, ult-locked for 3 enhanced Basics
- Top Loot Box trigger from ally Skill Point spending: 100% on first proc, drops to 20% of current chance after, with three random follow-up effect rolls
What this means for Feiying: if you own SW999 already, Feiying's role compresses. She becomes the secondary Elation DPS, the SW-substitute when you need a second team for endgame modes that demand two squads. That's not a bad role — Pure Fiction's two-stage format alone justifies a second Elation team — but it changes the calculus on whether to chase her signature.
If you don't own SW999 and Mortenax Blade isn't your priority, then 0+0 Feiying with the build above is a self-contained answer to current Memory of Chaos and Pure Fiction content. The 3-cycle Kafka clear on auto demonstrates that. Resource-rich players can lift the ceiling with the signature; resource-light players don't need to.
The personality and visual design are strong enough that even players who don't need her mechanically have a reason to pull. That's the soft argument the video closes on, and it's a fair one — but it's an aesthetic argument, not a power one. Treat it as such when you're deciding whether to break the pull-budget rule for her.


Comments