
Spiral Abyss Guide: Best Teams & Tips for a 36-Star Floor 12 Clear
Check the clock, not your damage
Pull up your last failed Floor 12 chamber. Look at one number: how much time was on the buzzer when the enemies dropped, or whether they dropped at all. That single readout sorts your problem into the right pile.
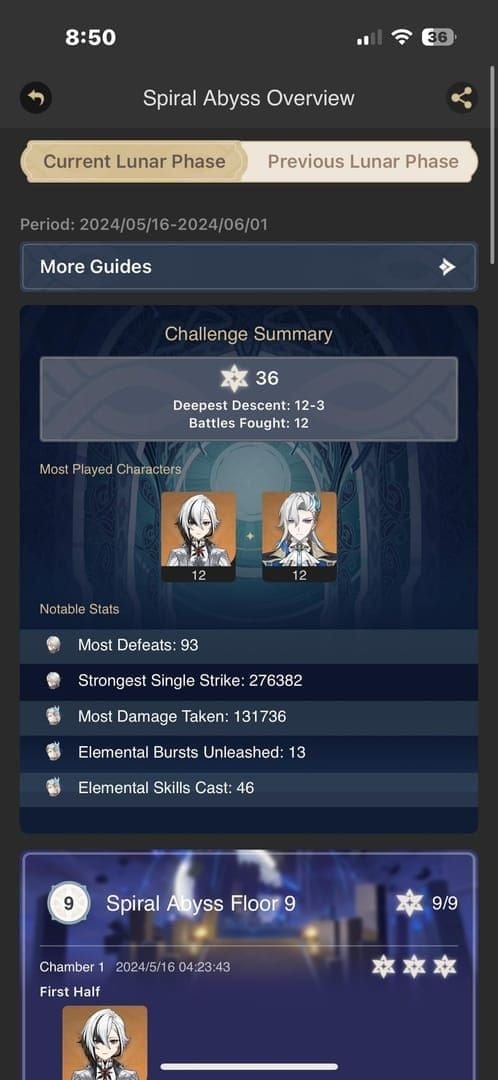
800 Primogems a month for a full 36-star Abyssal Moon Spire run. No limited 5-star required. A clean National or Hyperbloom rotation handles Floor 12 if you pass the DPS check inside the window, and that "if" is doing most of the work for people who think they're stuck on character power. They aren't. They're stuck on the timer.
The 3-star threshold on Floor 12 asks for 420 seconds remaining off a 10-minute base, with 2 stars at 300 and 1 star at 180, per the Genshin Impact Wiki - Fandom. Parse that. The bar isn't "kill the enemies." It's "kill them inside roughly 180 seconds of live combat per half." Floors 1–4 squeeze you onto a 300-second chamber clock, Floors 5 and up loosen to 600, but the star gates only start biting in the Spire.
So the loss splits into two flavors. Enemies dying but you keep eating a 2-star? Rotation and uptime. You're burning seconds on dead frames, a sloppy swap order, or standing around waiting on burst energy. Enemies still standing when the buzzer goes? Now you've got a real damage ceiling. From what I've seen in clear footage, that second case is way rarer below the very top of the floor than people want to believe. The reflex to go reroll artifacts is usually treating the wrong disease entirely.
One mechanic reframes the timing math, and I'd burn it into memory first: the chamber clock doesn't start when you load in. It starts the moment you deal or take damage. So that countdown animation is free prep. Drop Bennett's burst circle, get your buffs live, set your positions, then commit to the opener. Players who charge in swinging are gifting 3–5 seconds of buff uptime to absolutely nobody.
Mistime the reset and you've thrown away a chunk of a banner
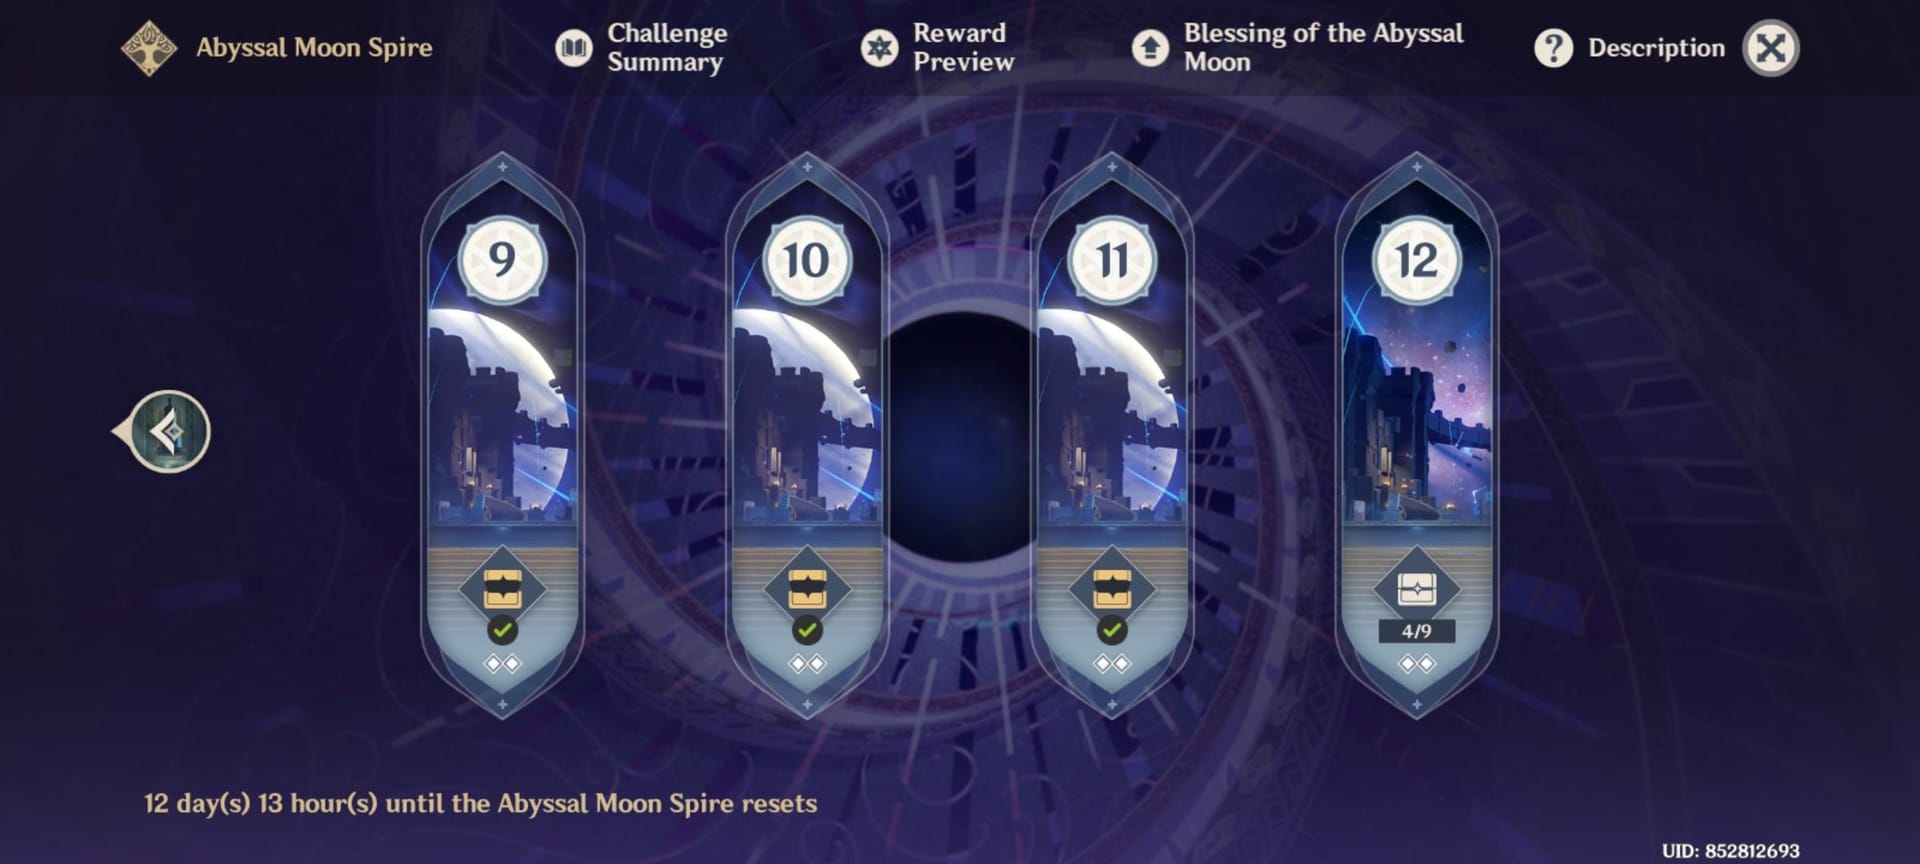
The Spire flips on the 16th of each month. New enemy lineup, and the Blessing of the Abyssal Moon rotates to a fresh Lunar Phase, per HoYoverse Support. The date genuinely trips people up, so nail it down.
Old videos still reference a 1st-and-17th cadence. Stale. The official docs say the 16th and that's held across the 2026 cycles. Any guide telling you enemies refresh on the 1st is running off a dead schedule. The Corridor (Floors 1–8) is a one-and-done clear; only the Spire runs on the monthly loop.
Now the layer most reward breakdowns just skip. Your stars hold within a cycle, but the rewards bank a single time. So if you're a planner: clear your 36 stars right before a banner you've been saving for, and those 800 Primogems land in your wallet exactly when you're tallying pulls. I line every chase up this way. Sync the clear to the wish-count and it's effectively a free slice of a 10-pull dropped at decision time. The Primogems don't get richer. Their timing does.
| Feature | Requirement / Value |
|---|---|
| Adventure Rank to unlock | AR 20 |
| Moon Spire reset | 16th of each month |
| Corridor (1–8) rewards | One-time, 2,400 Primogems total |
| Moon Spire (9–12) rewards | 800 Primogems per reset |
Source: Genshin Impact Wiki - Fandom and HoYoverse Support (2026)
That 2,400 Corridor figure feeds straight into the biggest time-sink in the whole mode.
Floors 1–8 are a trap if your time is tight
Grinding the Corridor expecting recurring Primogems gets you a fat goose egg. Those 2,400 pay out once, on first clear, and never again. I've watched newer players re-run Floor 7 every reset like it's a commission. Pure wasted clock.
Blunt structural reality: only Floors 9–12 carry ongoing value. Clear the Corridor one time for the lump (worth doing, that's nearly a 16-pull), then forget it exists unless a quest yanks you back. After that, every cycle your entire Abyss routine lives in the Spire. Done the Corridor and sitting at AR 20+? You're cleared for the part that actually repeats. The AR 20 unlock gate, confirmed by Fandom and IGN, was never the hard part anyway.
Read the ley line before you pick which half gets your A-team
Each Spire half carries a Ley Line Disorder, a chamber-wide modifier, layered on top of the rotating cycle blessing. Reading both right is how you cheese a DPS check instead of grinding face-first through it. The 6.5 cycle shows why element matchups stopped being optional a long time ago.
In the May 2026 6.5 cycle, Floor 12's front half ran a 75% Pyro DMG Bonus ley line, while the back half cranked Lunar-Bloom reactions by 75%, per Game8. That's a giant neon arrow, not flavor text. National wants the Pyro half. A Bloom-based Dendro squad wants the back. Send them backwards and you've left a 75% multiplier on the floor, then you're standing there confused about why you came up 40 seconds short.
The blessing rotates on the same monthly beat as the reset, fresh Lunar Phase each 16th. So don't lock one team in forever. Check the current ley line every cycle, because the exact roster that 9-stars one month can flat stall the next on element mismatch alone. Game8's chamber-by-chamber breakdowns are built around this, with their guide authors noting that "Floor 12 requires specific element matchups and team splits for 9 stars."
The disorder interaction worth knowing: ley line bonuses stack with enemy auras, so your swirl and res-shred order changes which half deserves your stronger four. If one half has both a friendly ley line and enemies you can shred clean, that's where a weaker team punches above its build. Which means sometimes you send your A-team to the harder half, not the one that looks juicier on paper.
Floors 9–11 are about discipline, not new tricks
Three floors that come down to not bleeding seconds, because the strategy barely moves. Floor 11 hands you 200 Primogems plus 60,000 Mora for all 9 stars, and Floor 12 pays the same headline Primogems at a real step up in difficulty, per Game8's 6.5 guides.
| Floor | Primogems (9★) | Mora | Other |
|---|---|---|---|
| 9–11 | 200 | 60,000 | Artifacts |
| 12 | 200 | 60,000 | Artifacts |
Source: Game8 and Genshin Impact Wiki (2026)
The leak on 9–11 is almost always the same two things: chasing scattered mobs around the arena instead of grouping them, and over-killing the opening chamber when the real timer pressure sits on the last. Lean on crowd-control. A Kazuha or Sucrose gather folds three separate kills into one reaction window. Treat each half as one burst sequence, not a brawl.
There's a quality-of-life shortcut that saves genuine minutes, dropped in version 5.1 and still live in 2026: fully clear Floors 11 and 12 in a cycle and you can skip 9 and 10 outright, per Game8. The Retry Challenge button from 5.7 lets you restart a single chamber without nuking the whole floor, a HoYoverse QoL add. Both features exist precisely so you stop re-grinding solved content. Use them.
Floor 12 chamber by chamber, where the stars are actually won
Floor 12 enemies sit at Level 95+ in the 6.5 cycle, per Game8, and the three chambers ramp from "DPS check" to "DPS check with survivability tacked on." Here's how I'd run each, framed around the timer-first diagnosis up top.
Chamber 1 is your warm-up and your rotation rehearsal. Both halves usually fall to a clean burst sequence. The trap is treating it like a freebie and fumbling your swap order. If you can't 3-star Chamber 1 comfortably, your rotation isn't tight enough for what's coming, and that's your cue to drill the sequence before you so much as look at substats.
Chamber 2 is where the split decision gets real teeth. Read both halves' compositions before you lock anything in. One half mob-heavy, the other a lone elite? Your AoE team (Hyperbloom, National with Xiangling's Pyronado) goes on the mobs, your single-target pressure goes at the elite. This is also where the "lead with your weaker team" logic kicks in. If the second half holds the nastier DPS check, run your B-team on the easier front so your A-team's cooldowns and energy come into the wall completely fresh.
Chamber 3 is the wall, and it's almost always a two-part DPS check against enemies that don't die quietly. Front-half versus back-half element matchups matter most here. In 6.5, the Pyro ley line made National a natural fit up front, the Lunar-Bloom back half rewarding a Dendro reaction comp, per Game8's Floor 12 guide. The recurring pains (Abyssal Lectors and Heralds, consecrated beasts, the odd Hydro Tulpa) punish you for skipping your pre-positioning during the free countdown. Buffs up, then engage.
Missing the third star specifically on Chamber 3? Run the diagnosis once more. Were they alive at the buzzer, that's damage. Did you clear with under 7 minutes left, that's rotation and uptime. GenshinTactics analysts, working off Akasha.cv top clears, point to Hyperbloom plus Vape as the highest clear-rate pairing for the May 2026 cycle, a handy pointer if your current comp just isn't matching the enemy elements.
A working second team beats a stronger first one
The format hands you two teams of four, no shared characters, and this is where stuck players actually bleed out. Your first squad can be a showpiece, but if the second is a patchwork that gasses out on energy, you've already hard-capped at 27 stars. Once your first team is "good enough," a functional second four does more for your total than buffing the first one further.
One energy rule enforces all of this and gets misread constantly: particles don't carry between teams. Energy generated on Floor 12's front half evaporates the second your back team loads. So piling Energy Recharge onto Team 1 does nothing for Team 2. It just means Team 1's supports were drowning in surplus they never needed. A failure pattern that circulates on r/GenshinImpactTips in 2026 is exactly that, stacking ER on team one while team two starves for particles. Spread your ER across both, don't front-load it onto your favorites.
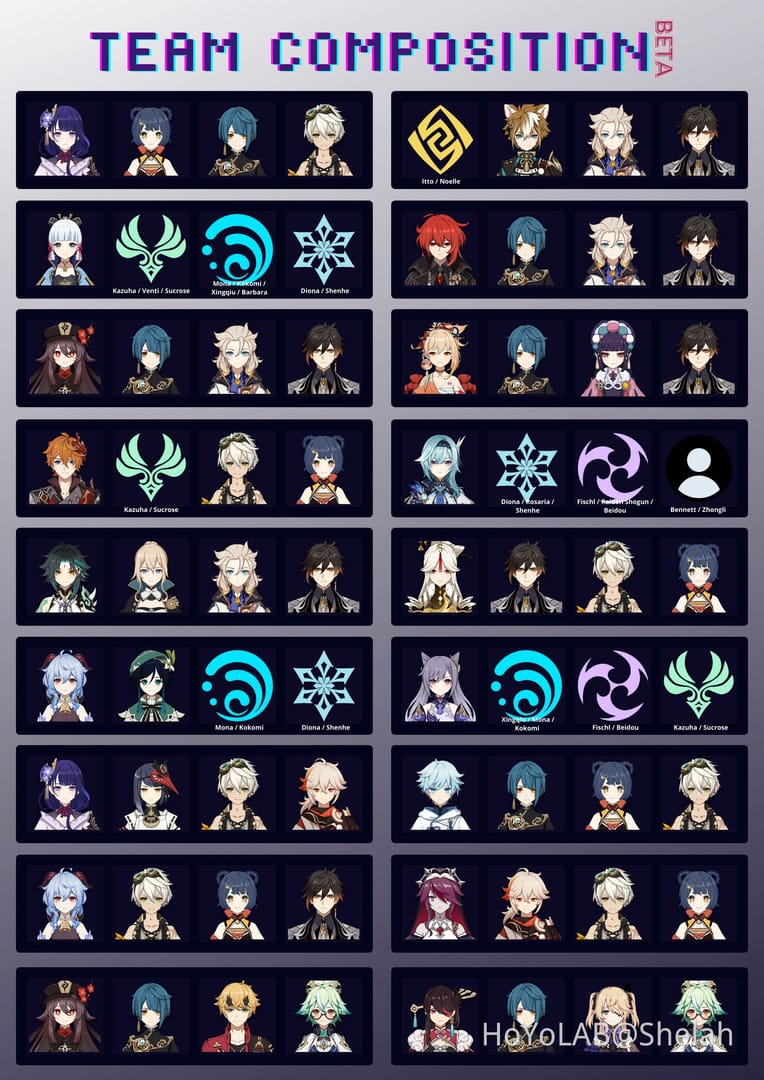
Community consensus on what clears for free is settled. The National core (Xiangling, Bennett, Xingqiu, Raiden) stays the recommended F2P backbone across multiple 2026 cycles per Reddit and YouTube guides, and Hyperbloom variants post strong clear rates on mob-heavy halves, per GenshinTactics. F2P 4-star cores clear Floor 12 in 2026 with 160–200% Energy Recharge tuned onto supports, per Bittopup and Reddit guides. The Bittopup 4-star guide says it flat: "National team and Hyperbloom achieve 3-star clears with proper ER."
| Half | F2P archetype | Standard | Whale |
|---|---|---|---|
| First | National | Hyperbloom + Furina | Mavuika carry |
| Second | Hyperbloom | Vape / Freeze | Skirk + supports |
Source: GenshinTactics and Game8 (2026)
A limited 5-star changes speed, not possibility. Whale comps run premium carries like Mavuika or Skirk to crunch sub-2-minute chambers per 2026 YouTube clears, and a standard player slotting a Nahida or Furina gets flexible coverage across both halves, per GenshinTactics' meta read. But faster isn't required below the top of the floor. That "you need a meta limited unit for 36 stars" narrative is mostly false for the Spire. It's a comfort-margin claim wearing a hard-requirement costume.
If you're genuinely short a key piece and decide a pull's worth it before your next chase, that's your spend call. One route to handle the recharge is Genshin Impact top up. The teams above clear without it.
Is a healer helping you, or stealing your timer?
"Always bring a healer to Floor 12" is a half-truth that bleeds stars off experienced players. A healer slot you don't need is four characters where one isn't contributing to the kill, and on a pure DPS-check chamber, that's how a clear collapses into a 2-star.
The honest version, pulled from a stack of 2026 guides: a healer or shielder is mandatory on survivability-heavy chambers, the ones with relentless aggression, environmental chip, or enemies that one-shot through your defense, and a dead weight on chambers that are flat damage races, per Game8 and YouTube Floor 12 walkthroughs. The call is per-chamber, never per-floor. Veterans usually clear faster running a shielder plus disciplined dodge timing, since a shield doesn't eat a turn the way a heal rotation does. Newer players still learning enemy tells? Take the heal, it's cheap insurance. Bennett, as it happens, dodges the entire argument by being a heal, an ATK buff, and a Pyro battery in one slot, which is a big slice of why the National core has outlived years of power-creep obituaries.
Does HoYoverse tune the Abyss to sell banner units?
The recurring accusation: enemy lineups get rigged toward whatever's on the current banner. Evidence is softer than the conspiracy wants. Element matchups do shift each cycle (the Pyro-then-Lunar-Bloom split in 6.5 is real and Game8-documented), and a banner unit will sometimes slot beautifully into the active ley line. But the F2P National and Hyperbloom cores have cleared 36 stars cycle after cycle in 2026 no matter what's on sale, per Bittopup and community consensus. If lineups were engineered to wall clears behind purchases, those 4-star cores would've stopped working ages ago. My read: the cycles reward roster flexibility, which can feel like buy pressure when your roster's thin, but that's a depth gap, not a paywall.
Who should actually grind 36 every cycle
Not everyone, and the per-roster picture makes that obvious. A full 36-star clear pays 800 Primogems for roughly 30–60 minutes of effort, per HoYoverse Support and Fandom, a rate community guides peg around 13–27 Primogems a minute versus roughly 10–20 for a 9-stars-only partial, per Game8 and YouTube clear-time estimates. Run consistently over a year, that stacks to about 9,600 Primogems, off the official monthly reward figures.
By player type:
- F2P / zero-spend: Worth it, no asterisk. Build two 4-star teams (National + Hyperbloom), tune ER into that 160–200% band, chase 36 every cycle. One of the best Primogem-per-effort activities you've got, given the rate above.
- Standard player with a few limited 5-stars: Easy yes. Slot a Nahida or Furina for half-flexibility and you clear faster with fatter margins. Bank the reward around your next banner.
- Whale with a deep roster: A non-question. You'll sub-2-minute most chambers. Only optimization left is element-matching the ley line for style points.
- Time-limited casual: This is the one where I wouldn't push for 36. Target 27 stars on Floors 9–12 and you bank 600+ Primogems without the full grind, per community advice, the rational stop if your roster can't field two strong fours. Chasing the last 9 when your second team's held together with duct tape is hours of frustration for a few hundred Primos. Take the 27, walk away.
The thread tying all of it together: before you reroll a single artifact to "fix" a clear, confirm it's a damage problem and not a rotation one. Rerolling substats to solve a timer loss is the most expensive way to repair the wrong thing, a regret documented across 2026 community guides. Tighten the rotation, balance the energy, match the element, and most of you will find the stars were sitting there the whole time.
Frequently Asked Questions
Why do I keep running out of time on Floor 12 even when my characters are built?
Almost always rotation order and energy, not raw stats. The chamber clock only starts ticking when you first deal or take damage, so use the countdown to pre-buff and position. If enemies are dying but you keep landing on 2 stars, you're losing seconds to dead frames or waiting on bursts, not to weak damage. Drill your swap sequence before you touch a single artifact.
Can a complete F2P player really hit 36 stars without any limited 5-stars?
Yes, and it's been the steady reality through 2026. National (Xiangling/Bennett/Xingqiu/Raiden) and Hyperbloom variants clear Floor 12 with supports tuned to 160–200% Energy Recharge, per Bittopup and Reddit guides. The catch isn't your first team, it's having a second functional four. Particles don't carry between teams, so your B-squad needs its own energy economy from scratch.
When exactly does the Spiral Abyss reset and the enemy lineup change?
The Spire (Floors 9–12) resets on the 16th of each month, refreshing enemies and rotating the blessing, per HoYoverse Support. Ignore older videos citing the 1st or 17th, that schedule's dead. Floors 1–8 are a one-time clear that never resets, so there's nothing to re-grind down there.
How many Primogems is a full clear actually worth over time?
Each 36-star reset pays 800 Primogems for the Spire, plus a one-time 2,400 from the Corridor, per the Fandom wiki. Run it consistently and that's roughly 9,600 a year from the monthly clears alone, before you even count Mora and artifacts. Time it before a banner and it lands as a real pull chunk.
Do I have to bring a healer to Floor 12?
Depends on the chamber, not the floor. Survivability-heavy halves with constant aggression genuinely want a healer or shielder. Pure DPS-race chambers punish you for the wasted slot, per Game8 and community Floor 12 guides. Experienced players often run a shielder plus dodge timing to clear quicker. New players should keep the heal as cheap insurance until enemy tells become muscle memory.


Comments